Showing posts with label Activity. Show all posts

Friday, May 11, 2012

Flannel Friday: My Mommy Is Special!

Happy Flannel Friday!


AND...


to all the Moms and Grandmothers, too!

My contribution this week is Flannel Friday-inspired by Mollie at What Happens in Storytime... and also by these lovely felt "Moms" and "Daughters" made by Shelia at Note Songs.

Watch for the surprise!


M - O - M - M - Y
Sung to: "BINGO"

I have a very special friend 
And Mommy is her name-o!
M - O - M - M - Y
M - O - M - M - Y
M - O - M - M - Y
And Mommy is her name-o!

Here comes the surprise!


Each flower has a different Mommy on the other side!
So as you sing the song, each time you will turn a flower over to reveal a new Mommy.
For each new Mommy, you will add a kiss instead of singing the letter.


For example, the 2nd verse would be:

I have a very special friend 
And Mommy is her name-o!
(Kiss) - O - M - M - Y
And Mommy is her name-o!

At the end, there will be 5 kisses and 5 Mommies ready for the next song. :o)


Five Pretty Mommies
Sung to: "Five Little Ducks"

Five pretty mommies I once knew.
Cute ones, busy ones, happy ones, too.

But the one in the middle, pretty as can be.
I love her and she loves me!

Down to the grocery store we did go,
Skippety-hop, skippety-hop, to and fro.

But the one in the middle, pretty as can be,
I love her and she loves me!


Here is another song for our lovely Mommies:


Mommy Is Special
Sung to: "Frere Jacques"

Mommy is special.
Mommy is special.
~ If you look ~
~ You will see ~
Someone very special.
~ It is Mommy! ~
~ It is Mommy! ~

I hope everyone enjoys a delightful Mother's Day with their families! 

If you are looking for a quick, simple, last-minute gift for your children to make for the special lady in their lives, here is the one we made at our Family Storytime last night. 
(Click on the picture for directions on how-to make it.)


And one last song to go with this special Mother's Day gift:

Hugs and Kisses
Sung to; "Frere Jacques"

Hugs and kisses,
Hugs and Kisses,
Just for you!
Just for you!
Just to tell you Mommy,
I love you!
I love you!


HAPPY MOTHER'S DAY!

And, as always,

HAPPY READING TOGETHER!

Monday, May 7, 2012

Activity: We're Going on a Bug Hunt

This past Friday, I shared some colorful and sparkly bugs for the Flannel Friday Round-up. I used them for several activities and songs during my Family Storytime on Thursday night and the little ones really loved them.

Here is one of the fun activities we did with them:


We're Going on a Bug Hunt!


Chorus:
We're going on a bug hunt!
We're going to catch a big one!
What a sunny day!
Are you ready? 
Okay!

Verses:
Oh, my! A ladybug!
A red and black ladybug
Crawling on a leaf.
Crawl, crawl, crawl!
Repeat chorus.

Oh, my! A firefly!
A brown and yellow firefly
Flickering in the sky.
Flicker, flicker, flicker! 
Repeat chorus.

Oh, my! A bumblebee!
A black and yellow bumblebee
Buzzing through the air.
Buzz, buzz, buzz!
Repeat chorus.

Oh, my! A grasshopper! 
A big, green grasshopper
Hopping through the grass.
Hop, hop, hop!
Repeat chorus.

Oh, my! A dragonfly!
A shimmery, purple dragonfly
Darting across the sky.
Dart, dart, dart!
Repeat chorus.

Oh, my! A butterfly!
A beautiful, orange butterfly
Fluttering through the air.
Flutter, flutter, flutter!
Repeat chorus.

Oh, my! A spider!
A huge, black spider
Spinning on its web!
Spin, spin, spin!

I think it is time to go home now!

Bye, huge, black spider!
Bye, beautiful, orange butterfly!
Bye, shimmery, purple dragonfly!
Bye, big, green grasshopper!
Bye, black and yellow bumblebee!
Bye, brown and yellow firefly!
Bye, red and black ladybug!

See you on our next bug hunt!

I hope you enjoy going on a Bug Hunt with your child/ren! For more learning with Bugs, be sure to check out the Bugs ABC'S Blog Hop. 

Photobucket

You'll find suggestions for Activities, Books, Crafts, and Snacks that are all about creepy-crawling BUGS and flying-through-the-sky BUGS!

Enjoy! And, as always,

HAPPY READING TOGETHER!

Friday, March 16, 2012

Not a Flannel Friday: RAINBOW Dancers!

Happy Flannel Friday, everyone!


Here in Florida, it is a beautiful Springtime day ~ which means a quick afternoon rainshower or two just might be in our future.


I love the rain! I love the smell of it! I love the sound of it! I even love the feel of it... as long as I don't have to stay at work in soaking wet clothes. :-/


But, most of all, I love what follows the rainshower.

               A GORGEOUS RAINBOW!


One of my all-time favorite things!


So in honor of Spring, rainshowers, and RAINBOWS, I have decided to share one of my favorite  RAINBOW activities for storytimes. If you have read any of my other Flannel Friday posts and Not a Flannel Friday posts then you have probably noticed a recurring theme of colors and even RAINBOWS.

(I did just say that RAINBOWS are my favorite, didn't I?)


Over the years, I have searched out books, songs, fingerplays, crafts, snacks, and even creative movement activities to help me share the colors of the RAINBOW with my storytime friends. In this post, I want to share one song ~ but believe me, I will be sharing more RAINBOW activities in the future! This is just one of many...


It is a song with fun movements as well as opportunities to dance freely to the music. It is my MOST requested storytime activity ~ no matter what the theme or season!


RAINBOW DANCERS
(Sung to the tune of: "Where, Oh, Where Is Sweet Little Susie?")

RAINBOW dancers let’s get ready
Hold your ribbons nice and steady.
You’ll hear the colors of the RAINBOW.
Listen for your time to go.
  

Shake red…
Shake orange…
Shake yellow…
Shake green…
Shake blue…
Shake purple…

Red ribbons turn around,
Orange ribbons up and down.
Yellow ribbons reach up high,
Green ribbons fly, fly, fly.


Everybody dance!


RAINBOW dancers, dance around,
Ribbons swirl up and down.
Overhead and on the ground,
RAINBOWS flying all around.

Shake purple…
Shake blue…
Shake green…
Shake yellow…
Shake orange…
Shake red…

Blue ribbons tickle your nose,
Purple ribbons touch your toes.
Everybody dance around,
Swirl your ribbons up and down.


RAINBOW dancers dance around,
Ribbons swirl up and down.
RAINBOW dancers hug a friend,
Our colorful dance is at an end.

***For this song, I have either streamers, curly ribbon, or regular ribbon cut into 12" or longer strips.

I always make more sets of the RAINBOW colors than I think I will need. That way I have plenty of each color and each child can choose their favorite.

Sometimes I don't have time for them to choose their color ~ sometimes they just get the color that is next in my hand.
***Switching things up now and again is a good learning experience ~ because, as grown-ups, we all know that sometimes you don't always get what you want. What a hard lesson for little ones to learn! But they do need to experience this lesson ~ hopefully, in a fun situation so that they are ready to accept it more easily in a not-so fun situation.

Before starting the song, I go over the ASL sign for each color. When I make a color sign, I ask the children with that color to wave their ribbon in the air. The parents and children who do not have the chosen color are asked to make the sign with me. We go through all the colors and then we are ready to start the song. Everyone holds their color out in front of them ~ ready to start.

This song and dance is an extremely fun way to teach color recognition and following directions. Even the older siblings and parents enjoy doing this dance ~ especially when we change it up and each person gets two colors! Having two colors is, of course, more difficult and requires even better listening.


I found this song on the Start Smart Songs for 2's and 3's CD.

Here is a description of this CD from the website:
"Music and movement can provide crucial experiences for building early brain activity.  This CD contains action activity songs that are fun, short, and simple for toddlers and preschoolers.  Each song has been carefully designed and selected to reinforce important early skills development from one of four crucial areas of early brain development wiring: physical, social-emotional, cognitive and language learning."


Click here for a link to the website for the creator of this CD and several other CDs that you might find helpful when planning a storytime full of active learning experiences.

Do YOU have any RAINBOW activities, books, or crafts to share? How about snacks or songs? I would love to hear about them! Just leave a message in the comment section below. Let's have a colorful discussion about our ideas!


I have one last picture to share with you:

This little one had such a blast during the "RAINBOW Dancers" portion of our storytime that she asked for all the colors of streamers so she could dance with each color at home. She even said "please"! How could I resist such a sweet request and such an adorable face?


EVERYBODY DANCE! 

Here’s Flannel Friday information for this week:


Our host from Canada is Angela at Valley Storytime


Talk about storytime and flannelboards at the Flannel Friday Facebook Page.
Follow Flannel Friday on Twitter with the #flannelfriday hashtag. (You don’t have to be on Twitter to check this out.)

And, last but not least, if you’re a contributor, there is an awesome blog button from Melissa and you can grab it from the right hand menu at Mel’s Desk!

HAPPY READING TOGETHER!

Friday, February 10, 2012

Flannel Friday: Valentine Race

Wow! Is it Friday again already?

This week has been CrAzY! But I have a feeling next week will be even crazier ~ especially since Tuesday is Valentine's Day and we have 3 storytimes scheduled for that morning! Whew!

Well, let's get down to business. Since it is Friday ~ that means it is time for Flannel Friday!

My contribution this week is a simple version of a very OLD but extremely FUN fingerplay:


VALENTINE RACE

Five little Valentines were having a race.

The first Valentine was frilly with lace.

The second Valentine had a silly face.


The third Valentine said, "I love you!"

The fourth Valentine said, "I do, too!"

The fifth Valentine was as sly as a Fox.
'Cause he ran the fastest to your Valentine box!
Yay!

The Valentines were easily made from felt. In fact, it was such an easy project that I decided to make a second set out of fun foam for the magnetic board...

I am not sure which I like better. I had fun making both sets. Which set do you like best?

Here is a list of supplies and quick directions to make the felt set.

Supplies Needed:

White felt
Purple felt
Red felt
Pink felt
Yellow felt
Orange felt
Black felt
Pink ribbon
Sticker eyes or wiggly eyes
Black Sharpie
Fuschia Sharpie
Tacky Glue
Sharp scissors


Directions:

1. Cut the lacy heart out of white felt and a regular heart-shape out of purple felt. Glue the purple onto the center of the lacy heart. Make a small bow out of the pink ribbon and glue onto the lacy heart.

2. Cut a regular heart-shape out of pink felt. Add sticker eyes or wiggly eyes using the glue. Draw on the eyebrows, nose and silly mouth with the black Sharpie.

3. Cut a regular heart-shape out of red felt. Cut a small heart-shape out of pink felt. Glue the small heart in the middle of the large heart. Add the letters and punctuation with the black Sharpie.

4. Cut a regular heart-shape out of yellow felt. Add the letters and punctuation using a fushcia Sharpie. I love this heart because it looks like a candy heart to me. :-)

5. Cut a regular heart-shape out of orange felt. Cut the upper part of the heart shape out of black felt and glue to the top of the orange heart. Cut "cheek" shapes from white felt and glue on. Cut eyes and nose out of black felt and glue on.

Now you have five little Valentines ready for a race!
Have fun!


***I just want to mention my inspiration for the fox heart. This week our storytimes have featured Michael Hall's book, My Heart is Like a Zoo. In his book, there is a "crafty" fox. I thought he was adorable and silly ~ just perfect for our race! What do you think? 


The top fox is made from felt and the fox to the right is made from fun foam.


I really love when I can tie our featured book in with our songs, learning activities like fingerplays and creative movement, and our crafts ~ when possible. These tie-ins help young children stay focused a little longer and help make more connections in their brains so that the children will be able to recall more about the storytime later in the day or week. I believe anything I can do that helps to make those connections possible is well worth the effort. :-)

This week, I was delightfully reminded of how these types of tie-ins were important to one particular storytime friend. One of our regular storytime Moms took this picture of her daughter creating her Lion Puppet at home. They proudly shared the picture with family and friends ~ and ME! ~ on Facebook. It was a sweet surprise because I am usually the one sharing storytime pictures with the families. ;-)


I am hoping to see an increase in the circulation of My Heart is Like a Zoo due to this family's enthusiastic sharing.  I am also hoping to see new families attend the library storytime next week. You just never know... I have already been contacted by a Mom asking for craft directions and the words to the song we sang with the puppet. What an awesome result for such a simple take-home craft!


HAPPY READING TOGETHER!


By the way, here’s Flannel Friday information for this week:

Library Quine has the round up at her blog, Loons and Quines @ Librarytime.


Talk about storytime and flannelboards at the Flannel Friday Facebook Page. Be sure to checkout my Flannel Friday Comment Challenge on the facebook page. This is the third week and I am offering an incentitive!

Follow Flannel Friday on Twitter with the #flannelfriday hashtag. (You don’t have to be on Twitter to check this out.)

And, last but not least, if you’re a contributor, there is an awesome blog button from Melissa and you can grab it from the right hand menu at Mel’s Desk!


Tuesday, January 24, 2012

Craft: Snowball Snowglobe

Last week at our Family Storytime, we enjoyed books, songs, and activities about snow, snowflakes, and snowmen. We also enjoyed making a craft! 


It was a "Snowball Snowglobe"!


Here are the Supplies needed for the craft:


Two 8 or 9 inch blue paper plates 
(I searched until I found plates with blue on top and white on bottom)
5 inch circle template
Pencil
Scissors
6 inch circle of clear plastic
(I will give you suggestions for this in the directions below)
Tacky glue
White glitter paint
Paintbrush
Styrofoam bowl
Snowman shape
(Several suggestions shared below)
Snowflake stickers
Iridescent confetti
Black sharpie
(Not pictured)
White ribbon
(Not pictured)

Directions:

1. Paint the bottoms of both plates with the glitter glue and let dry. (This step can be skipped if you don't have glitter paint and/or your library does not allow painting during your programs.)


2. Draw a 5 inch circle on the bottom of one of the plates. Be sure to center it. (It is hard to see in the picture but I used black cardstock to make my circle template.)

Heads Up: 
The next few steps should be done by an ADULT.

3. Carefully poke a hole in the center of the plate with a pair of sharp scissors.


4. Then cut from the center hole to the drawn outline several times ~ forming an X.

5. Now cut closely to the inside of the circle until it is all removed. (At this point I cut very closely to the line but not on the line yet. This allows me the ability to cut a smoother edge in the next step.)

7. Finally, cut along the drawn line with smooth cuts.


Child-friendly steps again:

8. This next step involves gluing something clear into the cut-out opening to make a "window"  so that your child can peer into the inside of your Snowglobe. The clear plastic is a 6 inch circle. I used our Ellison diecut to cut my circles out of leftover laminate from our laminating machine. I love to recycle ~ reuse ~ repurpose (whatever you want  to call it) and these laminate scraps were headed toward the trash can before I thought of this use for them. 

***If you don't have leftover laminate, 
*How about that leftover clear plastic from toy packages 
after your child opens Christmas presents 
or birthday presents or just gets a new 
toy because it looked so cool at the 
store yesterday?

*How about those folders with the clear plastic covers 
that you used for last year's budget report?

*How about a piece of Saran Wrap or part of a 
gallon-sized Ziploc bag?

There are lots of options if you just take a look around. ;-) It is easier for the parent or caregiver who is sharing this craft with one or two children. If you are a preschool teacher or a children's librarian, you will have to think ahead and start collecting what you need for all the friends that you will be sharing this craft with. But don't despair! I am sure if you share your idea with a few of your parents then they will help you out. :-)


When gluing the clear circle to the inside of the top plate, be sure to spread the glue all around the edge. The opening needs to be completely sealed so that no confetti can escape when the project is finished.

9. It is now time for the snow! Using the Tacky glue, make a "snowdrift" at the bottom of the 2nd blue plate. Then, shake some iridescent glitter on top of the glue and gently press it down to help it stick. Shake off any excess onto a piece of scrap paper and save for later.


10. While the glue and glitter are drying, build a snowman with the sticker set and add snowflake stickers, too.

***Snowflake sticker set was purchased from Oriental Trading as one of the prizes for our Snow program last year. I had enough leftover for this craft. I like this sticker set because it allows the child to build his/her snowman one snowball at a time. It gives the adult a chance to observe whether or not the child has mastered the idea of small, medium, and large, as well as, several other pre-reading and pre-math skills.


***Don't have any snowman stickers lying around:

*How about cutting out three snowballs from 
construction paper and adding details with 
crayons or markers?

*how about printing a snowman picture from the 
internet, cutting it out, and gluing it on the plate?

*How about finding a small toy figure around the 
house to glue to your snow scene?

Here again, there are lots of options if you just take a look around. ;-)


11. Once the snow scene is created and the glue has had time to dry, it is time for a SNOW STORM! Just add more confetti! As much or as little as desired.

12. Final step is to add glue all around the edge of the plate. Don't be stingy with the glue! We want to make a complete seal all around the plate so that when we shake our Snowball Snowglobe to make it "snow", we don't want any snow to escape.

Ooops! Did I say final step? Well, it is ~ unless you want to be able to hang up your Snowball Snowglobe when you aren't using it. If you want to hang it up, then cut a piece of ribbon to about  4 inches in length. Fold it in half and glue to the bottom plate at the top of your snowglobe. Once it is dry, it can be hung anywhere.

Final Craft:


It's a blizzard!


Here are a few pictures of my storytime friends and their Snowball Snowglobes:

This craft was made by a 4 year old. 
She decided she wanted to add some bigger snowflakes to the outside of her snowball. 
I love her creativity!
  
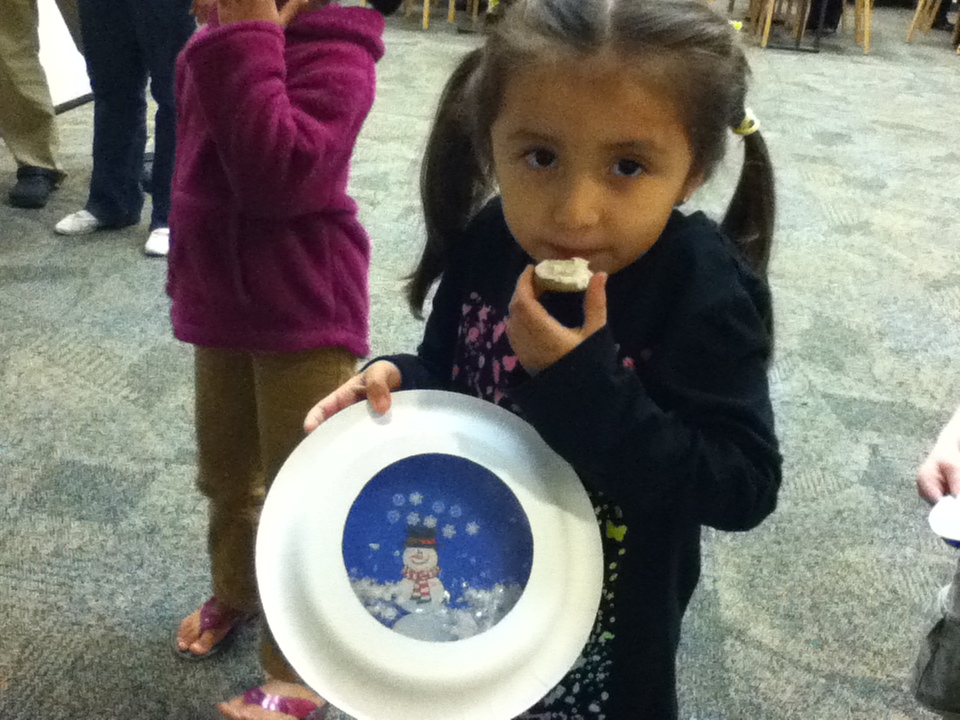
Another friend enjoying her snowball cookie while sharing her craft with me.

Hey, dude! Like my snowman?
(This friend is also 4 years old. If you look closely, he chose to make his snowman differently. 
His choices can actually tell his teacher or parent a lot about his abilities in certain pre-reading/pre-math areas.)

I hope you will consider creating a Snowball Snowglobe with a young child in your life. If you do, please stop back by and share your thoughts and maybe even some pictures with me. I would love to see your child's version of a Snowball Snowglobe!

I have some thoughts on a ocean-themed version. Check back with me ~ I am thinking maybe an underwater bubble full of sand and ocean creatures...

HAPPY READING TOGETHER!